မိမိ Website ကနေ Android Application ပြောင်းနည်း
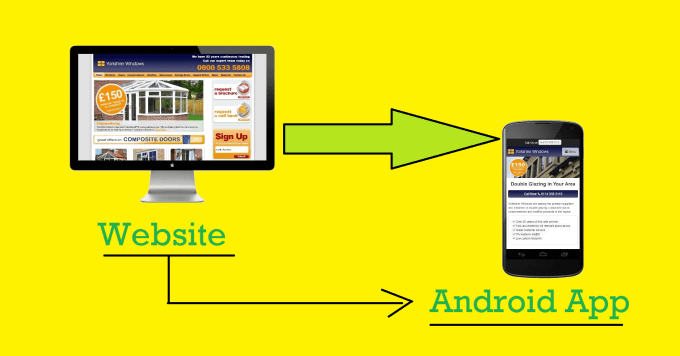
မိမိ Website ကေန Android Application ေျပာင္းနည္း
၁. ပထမဦးဆုံး ကၽြန္ေတာ္တုိ႔ Android Studio ဆိုတဲ့ software
လုိပါတယ္။
Android studio down ရန္ နွိပ္ပါ။
Install လုပ္နည္း ၾကည့္ရန္ – နွိပ္ပါ။
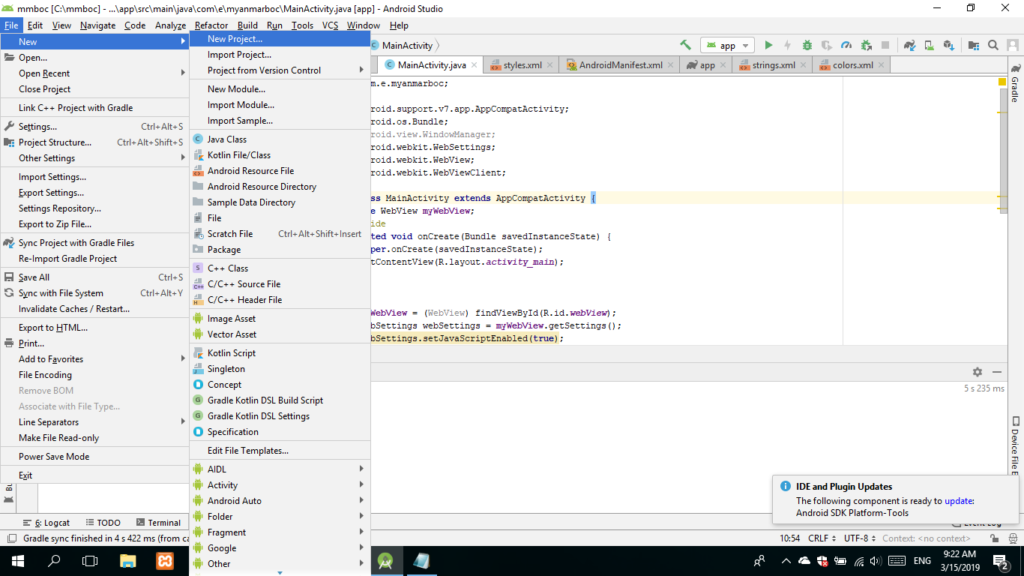
၂. Install လုပ္ျပီးရင္ file>>New>>New
Project ကိုနွိပ္ပါ။
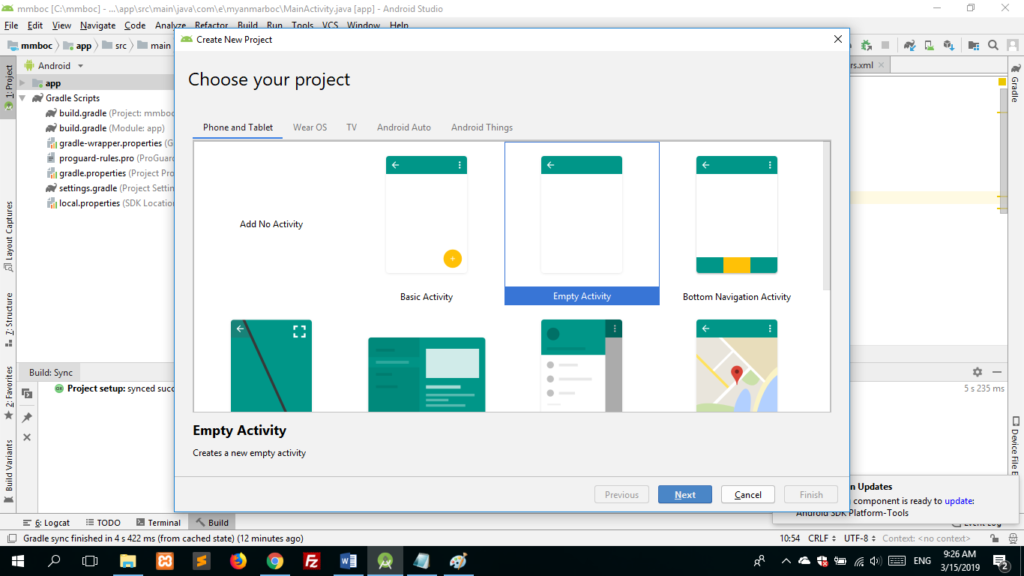
၃. Empty Activity
ကို ေရြးျပီး next ကိုနွိပ္ပါ။
၄. မိမိ app အတြက္ name ရယ္ package name ရယ္ location ကုိ
ၾကိဳက္ရာ ေပးပါ။
*** App name က အေရးၾကီးပါတယ္။ မိမိ app play store ေပၚတင္ရင္
မိမိ ေပးခဲ့သည့္ app name အတုိင္းျပမွာပါ။ ***
Language မွာ java ကိုေရြးပါ။
Minimum api level ကို android 4.0.3 ကိုေရြးပါ။
မိမိ app ကို android 4.0.3 ကေန install လုပ္ခြင့္ ေပးတာပါ။
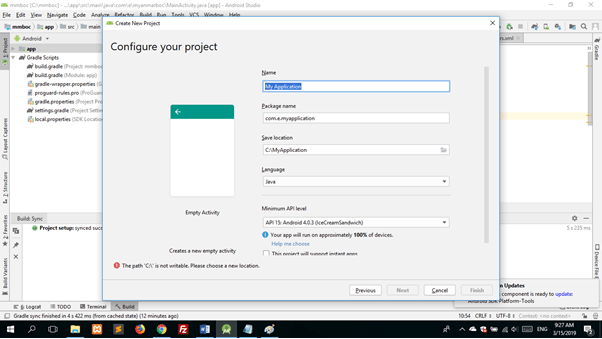
ၾကိဳက္ရာ ေရြးျပီးလွ်င္ finish ကိုနွိပ္ပါ။
၅. Syncing လုပ္ေနစဥ္ ခဏေစာင့္ေပးပါ။

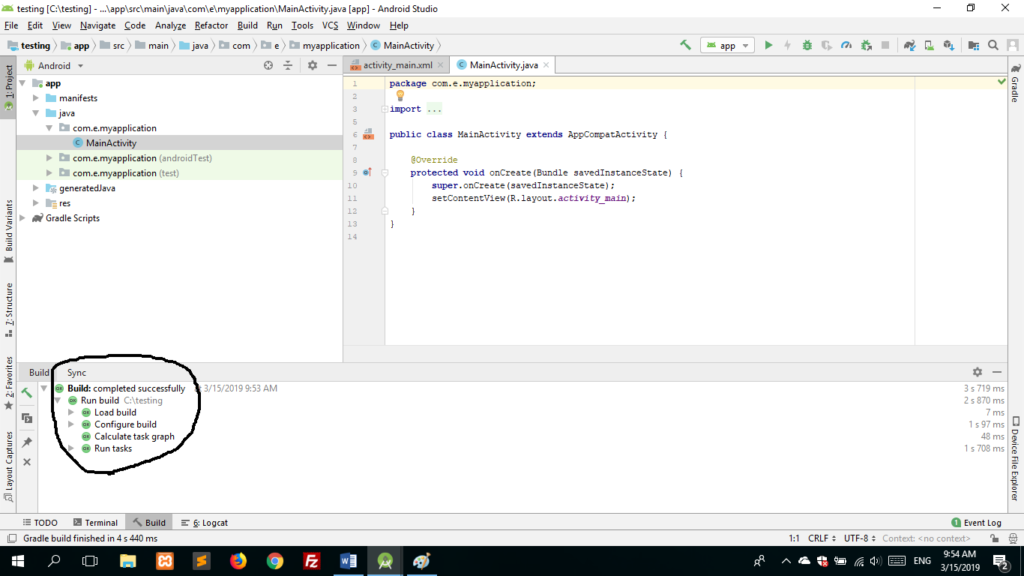
၆. ပုံထဲကလုိ အားလုံး အစိမ္းေရာင္ ျဖစ္ရင္ ရပါပီ။
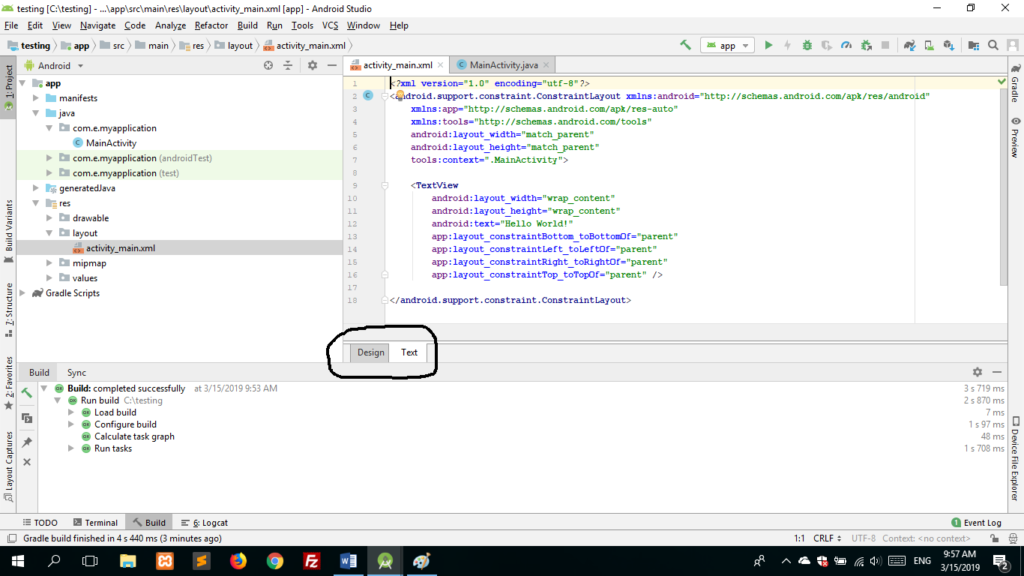
၇. App>>res>>layout>>activity_main.xml
ကိုသြားပါ။ ၀ုိင္းျပထားတဲ့အတုိင္း design နဲ႔ text မွာ text ကိုေရြးပါ။
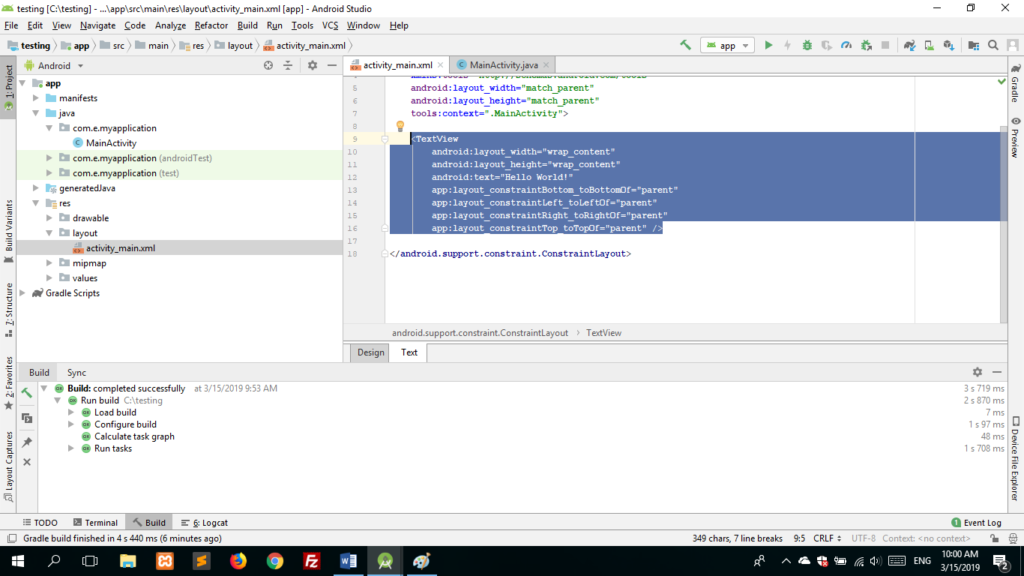
၈. ျပထားသည့္ေနရာ ကို ဖ်က္ျပီး
<WebView
android:layout_width=“fill_parent”
android:layout_height=“fill_parent”
android:id=“@+id/webView”
android:layout_alignParentLeft=“true”
android:layout_alignParentStart=“true”
android:layout_alignParentTop=“true”
android:layout_alignParentRight=“true”
android:layout_alignParentEnd=“true” />
ကိုအစားထုိးလုိက္ပါ။
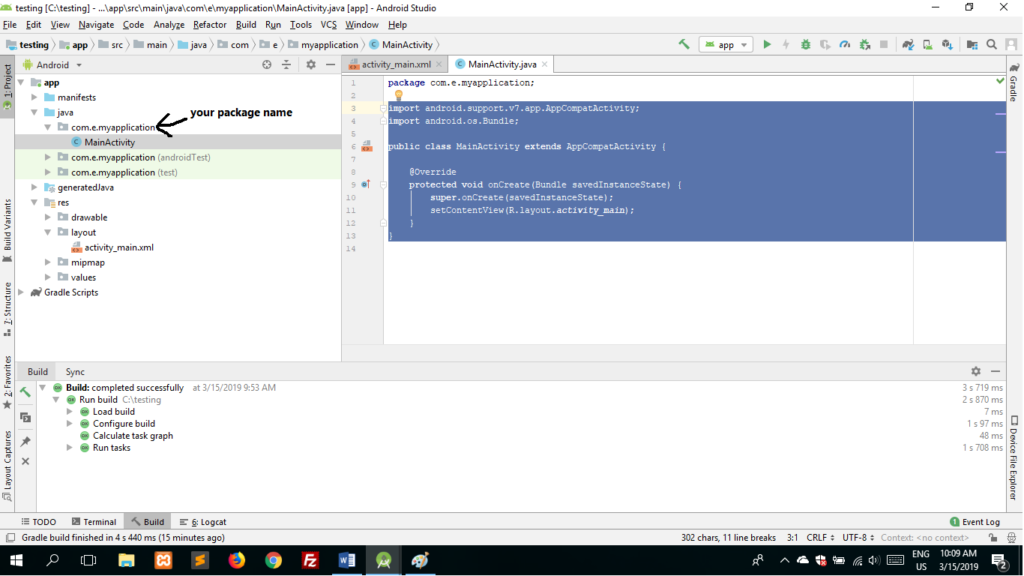
၉. App>>java>>com.e.myapplication>>MainActivity.java
ကိုသြားျပီး ျပထားသည့္ေနရာကို ဖ်က္လုိက္ပါ။ ျပီးရင္
import android.support.v7.app.AppCompatActivity;
 import android.os.Bundle;
 import android.view.WindowManager;
 import android.webkit.WebSettings;
 import android.webkit.WebView;
 import android.webkit.WebViewClient;

 public class MainActivity extends AppCompatActivity {
     private WebView myWebView;
     @Override
     protected void onCreate(Bundle savedInstanceState) {
         super.onCreate(savedInstanceState);
         setContentView(R.layout.activity_main);


         myWebView = (WebView) findViewById(R.id.webView);
         WebSettings webSettings = myWebView.getSettings();
         webSettings.setJavaScriptEnabled(true);
         myWebView.loadUrl("Your website URL");
         myWebView.setWebViewClient(new WebViewClient());
     }

     @Override
     public void onBackPressed(){
         if (myWebView.canGoBack()){
             myWebView.goBack();
         }else{
             super.onBackPressed();
         }

     }
 }
ကိုအစားထုိးလုိက္ပါ။ Your website URL ေနရာမွာ မိမိ website ကိုအစားထိုးပါ။
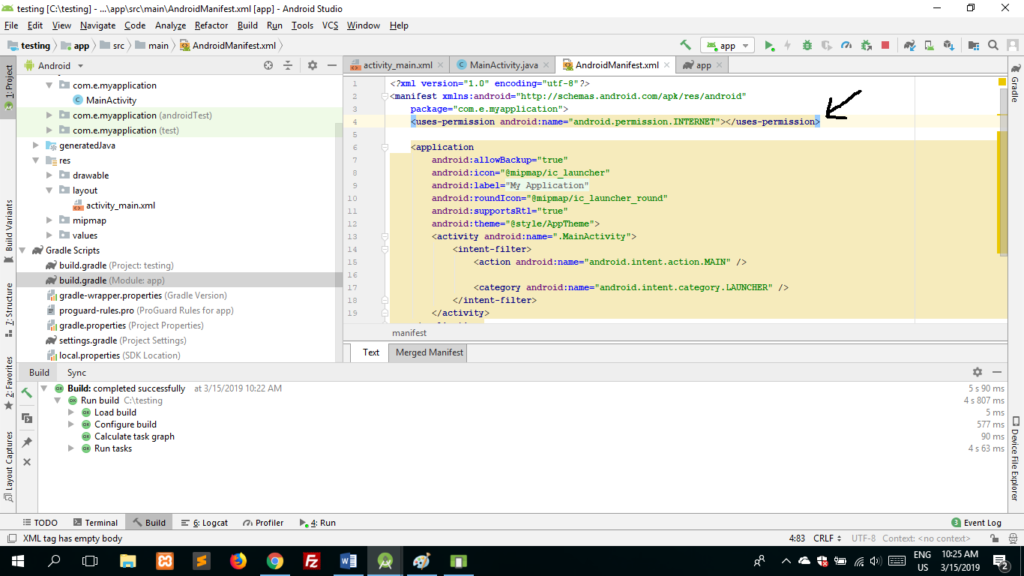
၁၀. App>>manifest>>>>AndroidManifest.xml
ကိုသြားပါ။
<uses-permission android:name="android.permission.INTERNET"></uses-permission>
ကိုထည့္ပါ။
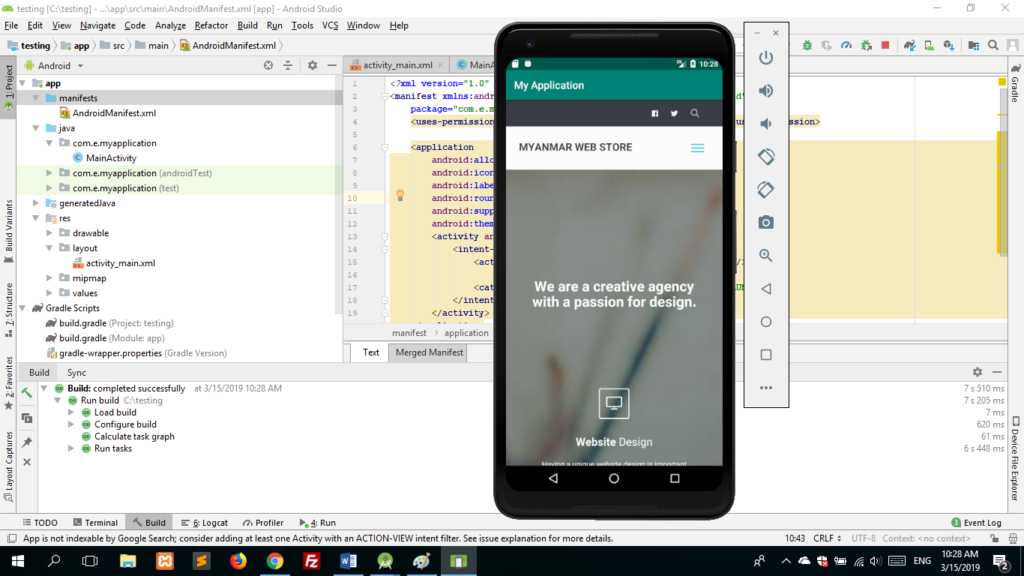
၁၁. သင့္ရဲ႕ webapp ေလး အလုပ္လုပ္ေနပါပီ။
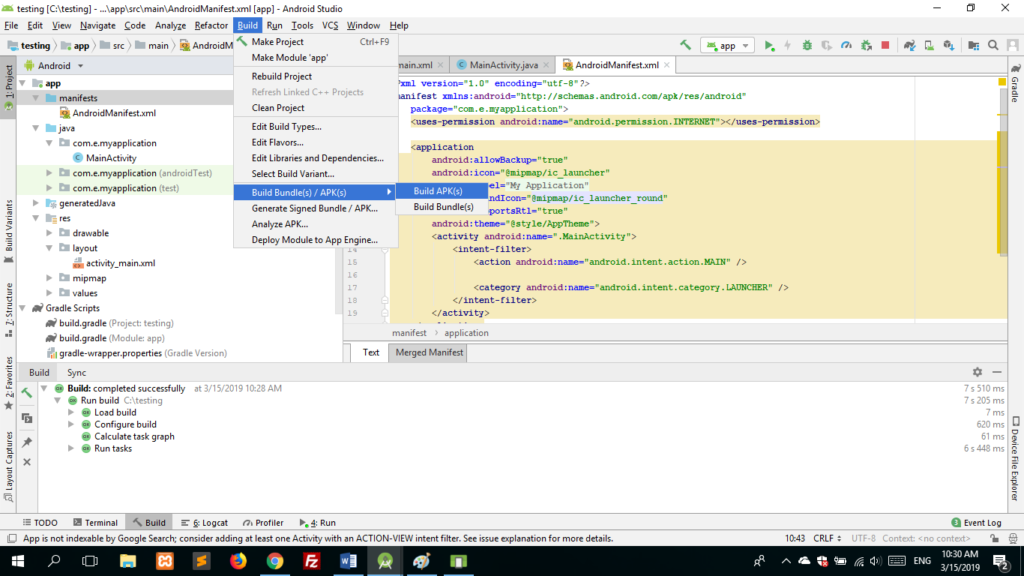
၁၂.build>>build bundle/apk>>build apk ကိုႏွိပ္လုိက္ပါ။
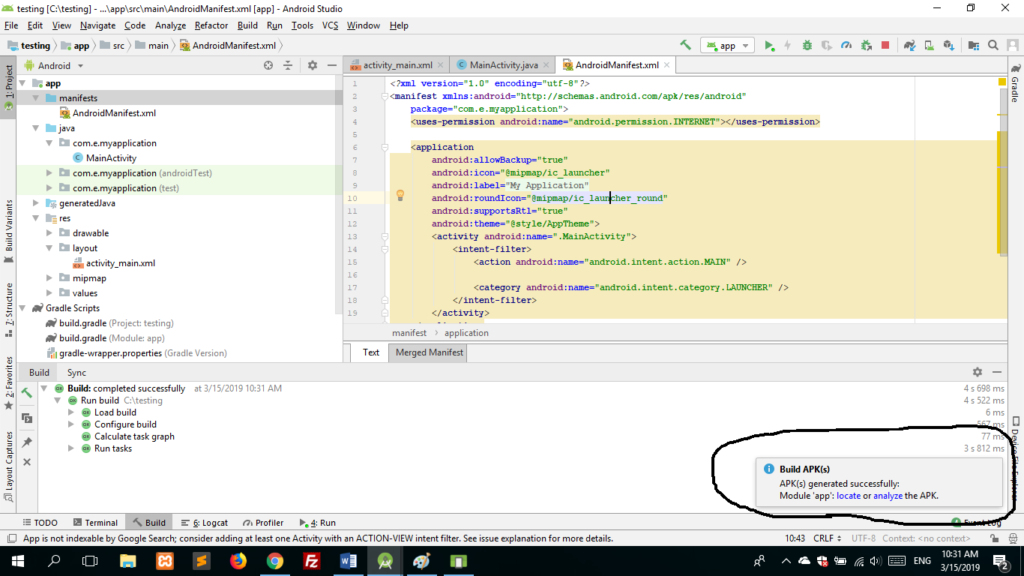
၁၃. Locate ကိုနွိပ္ျပီး သင့္ webapp ေလးရပါပီ။
အားလုံး အဆင္ေျပၾကပါေစ…
Click to learn Most Popular language to android development -> Kotlin
Related Articles- e-commerce လုပ္ငန္းေအာင္ျမင္ေအာင္ျပဳလုပ္ရန္ အခ်က္အလက္မ်ား
Like&follow in Facebook –Myanmar Web Store
Recommended Posts
What is Proxy Server?
မေ 18, 2021

Websiteတိုင်းအတွက်မရှိမဖြစ်လုံခြုံရေးSSL
အောက်တိုဘာ 23, 2020


Just wanna state that this is very helpful , Thanks for taking your time to write this. Karlee Leopold Gibeon
Nice bro thank you.
Nice bro thank you.
I was able to fund good advice from your blog articles. Katalin Judah Clance
i like this article
You made some decent points there. I did a search on the topic and found most guys will agree with your website.